 Sign in to Mod The Sims
- Site Map >
- Modding and Creation >
- Sims 2 Creation >
- Body Shop >
- Body Shop - Recolouring >
- tutorial help!!!plzz can i get at least one response
- Site Map >
- Modding and Creation >
- Sims 2 Creation >
- Body Shop >
- Body Shop - Recolouring >
- tutorial help!!!plzz can i get at least one response
#1
 21st Oct 2005 at 9:19 AM
21st Oct 2005 at 9:19 AM
Posts: 21
Thanks: 131 in 9 Posts
Advertisement
#2
21st Oct 2005 at 10:00 AM
21st Oct 2005 at 10:00 AM
I don't think anyone has explained how to 'do' celeb faces - the tools are simple enough, and you just need to keep adjusting your sim (helps to have a good front view (not smiling too much) and good side view photo of your celeb)
If you want to make outfits, there are tutorials - go look.
If you want to make outfits, there are tutorials - go look.
#3
21st Oct 2005 at 6:13 PM
Last edited by Nebulosa : 22nd Oct 2005 at 11:15 AM.
21st Oct 2005 at 6:13 PM
Last edited by Nebulosa : 22nd Oct 2005 at 11:15 AM.
Posts: 254
The face sliders in Bodyshop are the main tool for this. You may also want to make custom hair, eyes, make-up etc in some cases.
Nebulosa
"trying to keep the green mist as far away as possible from my nose"
Nebulosa
"trying to keep the green mist as far away as possible from my nose"
#4
22nd Oct 2005 at 3:34 AM
22nd Oct 2005 at 3:34 AM
Posts: 921
Thanks: 5724 in 61 Posts
First, you need a good eye for details. You are going to need a full front face and a profile face. Start with head shape, then work with nose, chin, and then eyes, choosing maxis defaults until you get something close. If you try to make one feature exact before going on to the next, then that feature gets distorted. By starting off with a face that's "close enough" without playing around, you stand a better chance of a good resemblance. After that, you use the body shop sliders to make the little changes to make the features more exact. Making the resemblance perfect after that is entirely up to you and your visual abilities.
"Living well is the best revenge. . ." George Bernard Shaw
"Living well is the best revenge. . ." George Bernard Shaw
#5
22nd Oct 2005 at 5:14 PM
22nd Oct 2005 at 5:14 PM
Posts: 65
Thanks: 924 in 17 Posts
I see from your download list that you've made celeb skins before. Are you asking about photoskinning where you place a photo of the celebrity over the Sim skin?
#6
23rd Oct 2005 at 12:05 AM
23rd Oct 2005 at 12:05 AM
Posts: 21
Thanks: 131 in 9 Posts
yea frenticfrantic thats what i mean ive seen people do this and i cant seem to figure that out
#7
23rd Oct 2005 at 5:05 AM
23rd Oct 2005 at 5:05 AM
Posts: 65
Thanks: 924 in 17 Posts
You need a graphics program like Photoshop or Paint Shop Pro that will allow you to do layers and select opacity of those layers.
The most basic description of the process is that you find a close-up photo of a celeb looking straight at you, copy that celeb's face and paste it onto the face of a skin that you have created in Body Shop. You then have to use Photoshop to massage the image so that the corners of the Celebs' eyes, edge of their nostrils and corners of their mouth perfectly overlay the face of the Sim.
It's a lot of cutting and pasting and painting and cloning to make the Sim look real and not a like a Sim with a leathery kind of sticker riding around on his/her face.
I make photoskins and could go into more detail but I'm not sure about your Photoshop skills.
#8
23rd Oct 2005 at 9:30 AM
23rd Oct 2005 at 9:30 AM
Posts: 21
Thanks: 131 in 9 Posts
im pretty good with photoshop but i wasent sure on doing the photoskining so plz feel free to go into more detail plus i can never find any good pictures
#9
24th Oct 2005 at 7:46 AM
24th Oct 2005 at 7:46 AM
Posts: 65
Thanks: 924 in 17 Posts
Here is a fast guide to the most basic kind of photoskinning where you place a face in a genetic set but do not recolor any of the other body components. I'm not going to go into any detail about how to use Photoshop tools so fair warning...
If you're looking for photos it is best to just skip the Google search images option and go straight to websites devoted to the celebrity you want to skin. Webmasters usually try to save bandwidth and protect their large and better quality images from Google.
There are also online blog communities and sites like Scantastic which offer up hi-res magazine scans.
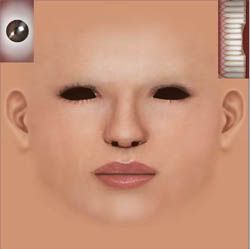
Go into body shop and create a genetic skin set. For this Sim I'm using the palest Maxis default. I open the folder of the skin set I created in the Projects folder of Sims and then open the afface~face~stdMatBaseTextureName.bmp in Photoshop.
For this guide I'm using a fair quality image of actress Elizabeth Hurley. If I were actually doing a photoskin it would much higher resolution but this works as a how-to.
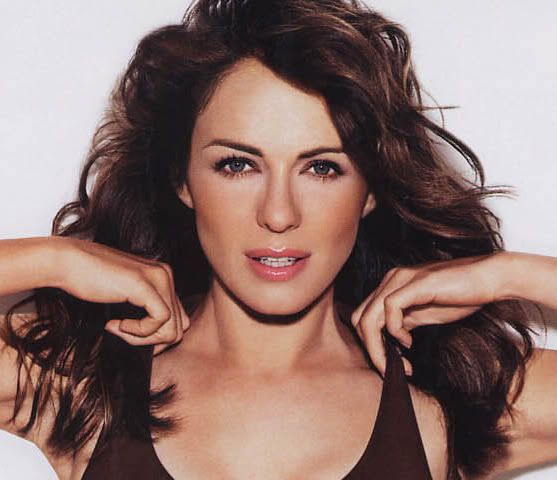
Use the lasso tool to select the face from the image, copy it and paste it as a layer onto the afface~face~stdMatBaseTextureName.bmp image.
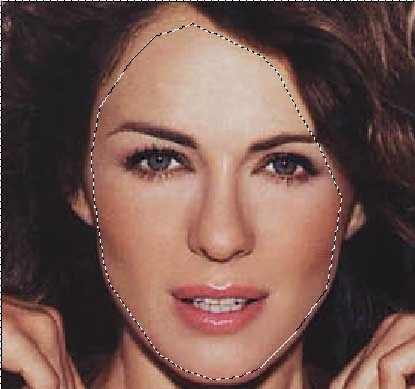
Knock the opacity of the layer down to about 50% so you can see through it and then use the free transform tool to resize the image of Liz to fit over the Sim face.

At this point you are only really concerned with the right and left corner of the eyes and edge of the nostrils and the bottom of the nose aligning correctly. Don’t worry about the mouth at this point.
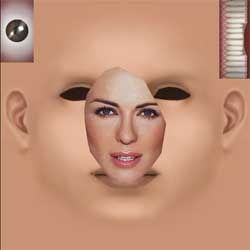
Once you are happy with the fit use the magic wand tool and select the black spots that make up the eyes and nostril on the background Sim layer and shift up to the Liz face layer and hit delete. If you leave behind the actual photo’s eyes and nostrils the image will just sort of float along the contours of the face and it’s harder to get a good sculpt. It also can have some funny genetic results if you play the Sim and you end up with a Sim baby with murky eyes and a completely flat and nostril-free nose.

I then adjust the opacity of the layer so that it falls somewhere in the 60-70% range. The better the image the less you have to play with the opacity but this pic is not great.
I’m taking the easy way out in doing the mouth. My usual technique involves cutting layers and positioning but this works well too.
Hide the top layer of Liz’s face and then using the contours of the mouth of the original Sim face as a guide outline the lips with the lasso tool. With the mouth still selected go back to the Liz face layer, invert your selection and using the clone tool get rid of any part of the celeb’s mouth that falls outside the outline.
Once you are done invert the selection once again and at this point you can do two things. The first is the easiest in that you just hit the delete key and wipe out the photo’s mouth and use the Sim default. I’m going with the second option which is to use the clone and brush tool to paint out the teeth and such.
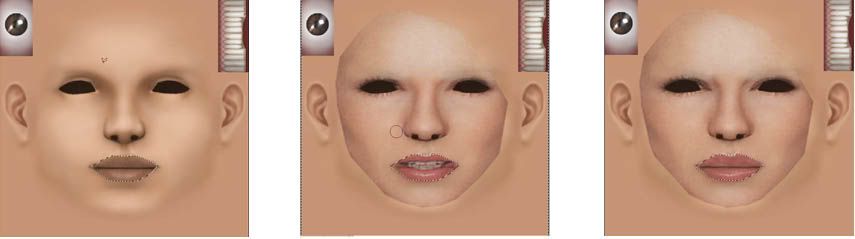
The last step is painting out the shadows and making the photo and the Sim skin merge into a whole. Throughout the last bit of the process I’ve had the Liz photo layer set at 64% and I leave it at that when I merge it down onto the background. It’s basically whatever you think looks good so adjust your layer accordingly.
I use the clone and brush tools set at varying opacities to make the face blend into the original Sim image. It’s all just trial and error. My suggestion is to use a 30-50 size brush and start from the inside and work out to the jaw line. Once you’ve done that use the eyedropper, pick the color of the neck and use the paint brush with a low opacity setting to get rid of any seams.
You end up with something like this:
And when you import it into a game it should work without any real problems.
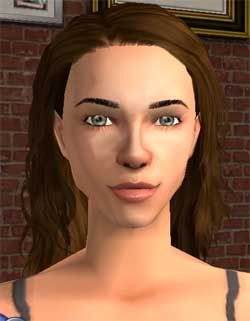
Now the sculpting is up to you.
If you're looking for photos it is best to just skip the Google search images option and go straight to websites devoted to the celebrity you want to skin. Webmasters usually try to save bandwidth and protect their large and better quality images from Google.
There are also online blog communities and sites like Scantastic which offer up hi-res magazine scans.
Go into body shop and create a genetic skin set. For this Sim I'm using the palest Maxis default. I open the folder of the skin set I created in the Projects folder of Sims and then open the afface~face~stdMatBaseTextureName.bmp in Photoshop.
For this guide I'm using a fair quality image of actress Elizabeth Hurley. If I were actually doing a photoskin it would much higher resolution but this works as a how-to.
Use the lasso tool to select the face from the image, copy it and paste it as a layer onto the afface~face~stdMatBaseTextureName.bmp image.
Knock the opacity of the layer down to about 50% so you can see through it and then use the free transform tool to resize the image of Liz to fit over the Sim face.
At this point you are only really concerned with the right and left corner of the eyes and edge of the nostrils and the bottom of the nose aligning correctly. Don’t worry about the mouth at this point.
Once you are happy with the fit use the magic wand tool and select the black spots that make up the eyes and nostril on the background Sim layer and shift up to the Liz face layer and hit delete. If you leave behind the actual photo’s eyes and nostrils the image will just sort of float along the contours of the face and it’s harder to get a good sculpt. It also can have some funny genetic results if you play the Sim and you end up with a Sim baby with murky eyes and a completely flat and nostril-free nose.
I then adjust the opacity of the layer so that it falls somewhere in the 60-70% range. The better the image the less you have to play with the opacity but this pic is not great.
I’m taking the easy way out in doing the mouth. My usual technique involves cutting layers and positioning but this works well too.
Hide the top layer of Liz’s face and then using the contours of the mouth of the original Sim face as a guide outline the lips with the lasso tool. With the mouth still selected go back to the Liz face layer, invert your selection and using the clone tool get rid of any part of the celeb’s mouth that falls outside the outline.
Once you are done invert the selection once again and at this point you can do two things. The first is the easiest in that you just hit the delete key and wipe out the photo’s mouth and use the Sim default. I’m going with the second option which is to use the clone and brush tool to paint out the teeth and such.
The last step is painting out the shadows and making the photo and the Sim skin merge into a whole. Throughout the last bit of the process I’ve had the Liz photo layer set at 64% and I leave it at that when I merge it down onto the background. It’s basically whatever you think looks good so adjust your layer accordingly.
I use the clone and brush tools set at varying opacities to make the face blend into the original Sim image. It’s all just trial and error. My suggestion is to use a 30-50 size brush and start from the inside and work out to the jaw line. Once you’ve done that use the eyedropper, pick the color of the neck and use the paint brush with a low opacity setting to get rid of any seams.
You end up with something like this:
And when you import it into a game it should work without any real problems.
Now the sculpting is up to you.
Lab Assistant
#10
24th Oct 2005 at 7:52 AM
24th Oct 2005 at 7:52 AM
Posts: 74
awesome!! im off to try tht now 
<3LOVEbringsCUDDLES<3

<3LOVEbringsCUDDLES<3
#12
4th Nov 2005 at 8:53 PM
4th Nov 2005 at 8:53 PM
Posts: 103
Oo thank you sooo much frentic frantic!!
Lab Assistant
#13
28th Mar 2006 at 10:56 PM
28th Mar 2006 at 10:56 PM
Posts: 164
Great tutorial frenticfrantic Thank you
#14
10th May 2006 at 3:21 AM
10th May 2006 at 3:21 AM
Thank you so much for this tutorial! I decided to give it a try today. My first one didn't come out to bad, but I chose the wrong skintone so I did a second one. I like the way it came out better, but I'm having trouble with the lips. The first try I did just the way you said. The second one though, I tried to copy his lips onto the base. I like the way it looks flat. LOL But in bodyshop it created a very odd effect. Almost looked like a mustache. I wish I had thought to take a screenshot of it, but I didn't. Anyway, here is what it looks like flat.

And this is the picture I used.

Could someone help me out?? I'm doing a pretty decent job sculpting his features, but I really need help with the lips. And he has SUCH great lips!!
Can't. Stop. Downloading.!!!
And this is the picture I used.
Could someone help me out?? I'm doing a pretty decent job sculpting his features, but I really need help with the lips. And he has SUCH great lips!!
Can't. Stop. Downloading.!!!

#15
10th May 2006 at 3:33 AM
10th May 2006 at 3:33 AM
Hehe, karialSim, I bet that does look kinda weird in Body Shop.
I find with doing facial skins, copy-pasting in smaller pieces works a lot better than a whole thing at once, for just the reason you're illustrating there... Individual pieces get stretched way out of shape with most photos.
When I select, I try to feather it some - a 5 pixel feather is usually pretty good. Then select little bits at a time. The eyebrow. The area under the eyebrow toward the inner corner of the eye. The cheekbone area. The side of the nose. The bridge of the nose. The tip of the nose and nostrils. The part beneath the nose with that little curve. The part to the side of the nose between that curve and the cheek. The lips. The chin. The area between cheek and chin. etc...
It's a lot more work and it requires blending pieces together a lot more and playing with it quite a bit more, but you usually end up with a very good result that matches the uv mapping fairly well - and if you're smart and don't collapse the layers together, you can save out incremental versions and preview it in Body Shop to make sure things are positioned right. Need to move the lips in some, raise the eyebrows? Just tweak the eyebrows layer.
I usually also do it 1/2 at a time. I'll get the left side (overlapping a little bit past the nose onto the right) all nice and perfect, then mirror it. Any imperfections like moles, freckles, etc. can then be added to the other side if you need to, but you have the base skin already done.
my simblr (sometimes nsfw)
“Dude, suckin’ at something is the first step to being sorta good at something.”
Panquecas, panquecas e mais panquecas.
#16
10th May 2006 at 3:13 PM
10th May 2006 at 3:13 PM
Ahhh, thank you! I'll try that. I didn't know I could use it in bodyshop without merging the layers. Which makes it a big pain to redo. LOL
Can't. Stop. Downloading.!!!
Can't. Stop. Downloading.!!!
#17
10th May 2006 at 8:14 PM
Last edited by karialSim : 10th May 2006 at 8:15 PM.
Reason: adding pics
10th May 2006 at 8:14 PM
Last edited by karialSim : 10th May 2006 at 8:15 PM.
Reason: adding pics
I decided to try myself (and I think I'm less of a perfectionist about me than getting my fave celeb JUST right lol). I used more of a feather when cutting out my face, and I think it blended much better. Not too bad anyway. Still doesn't look a LOT like me, but it's ok.
Thanks for the help! I'm going to try him again soon.
Oops! Forgot to put the pics in. LOL


Can't. Stop. Downloading.!!!
Thanks for the help! I'm going to try him again soon.
Oops! Forgot to put the pics in. LOL
Can't. Stop. Downloading.!!!
Test Subject
#18
10th May 2006 at 11:18 PM
10th May 2006 at 11:18 PM
Posts: 4
I did everything you said, and I saved the file (bmp), but the face is not showing up in body shop. Any ideas what I did wrong?
#19
10th May 2006 at 11:22 PM
10th May 2006 at 11:22 PM
sexyazell, you'll also need to make sure that the alpha for the project file is set so that your texture will actually show - just dump white into the alpha texture so the whole thing will be overlaid on the skin. You can always fill in black parts for the areas you don't need later.
my simblr (sometimes nsfw)
“Dude, suckin’ at something is the first step to being sorta good at something.”
Panquecas, panquecas e mais panquecas.
my simblr (sometimes nsfw)
“Dude, suckin’ at something is the first step to being sorta good at something.”
Panquecas, panquecas e mais panquecas.
Test Subject
#20
10th May 2006 at 11:26 PM
10th May 2006 at 11:26 PM
Posts: 4
This may sound dumb, but where is the alpha?
#21
11th May 2006 at 2:12 PM
11th May 2006 at 2:12 PM
Posts: 921
Thanks: 5724 in 61 Posts
Maybe you should swing over to tutorials and take a look. A lot of your questions will be answered by learning about the basics, and it'll open up a lot of possibilities for you.
"Living well is the best revenge. . ." George Bernard Shaw
"Living well is the best revenge. . ." George Bernard Shaw
Test Subject
#22
11th May 2006 at 4:20 PM
11th May 2006 at 4:20 PM
Posts: 4
I know that there is an alpha file when creating face makeup, but I don't see an alpha file when I create a skin. All I see are texture icons.
Test Subject
#23
11th May 2006 at 5:21 PM
11th May 2006 at 5:21 PM
Posts: 4
I figured it out. For some reason I had to change all of the face icons, not just the afface~face~stdMatBaseTextureName.bmp image. Thanks for all of your help. By the way, karialsim, I think you did very good for your first try
#24
12th May 2006 at 1:20 PM
12th May 2006 at 1:20 PM
Posts: 921
Thanks: 5724 in 61 Posts
There's no alpha file on full skins because the entire mesh shows. The alpha determines what shows and what's blocked out.
"Living well is the best revenge. . ." George Bernard Shaw
"Living well is the best revenge. . ." George Bernard Shaw
#25
12th May 2006 at 1:37 PM
12th May 2006 at 1:37 PM
Thanks sexyazell!
Can't. Stop. Downloading.!!!
Can't. Stop. Downloading.!!!
Who Posted
|
|