 Sign in to Mod The Sims
- Site Map >
- Modding and Creation >
- Sims 2 Creation >
- Body Shop >
- Body Shop - Recolouring >
- Gimp Tute 4:Creating Shadows and Highlights on an outfit with The Gimp
- Site Map >
- Modding and Creation >
- Sims 2 Creation >
- Body Shop >
- Body Shop - Recolouring >
- Gimp Tute 4:Creating Shadows and Highlights on an outfit with The Gimp
Replies: 19 (Who?), Viewed: 12767 times.
#1
 22nd Mar 2008 at 11:05 PM
Last edited by Saraswati5 : 22nd Mar 2008 at 11:51 PM.
22nd Mar 2008 at 11:05 PM
Last edited by Saraswati5 : 22nd Mar 2008 at 11:51 PM.
22nd Mar 2008 at 11:05 PM
Last edited by Saraswati5 : 22nd Mar 2008 at 11:51 PM.
Posts: 94
Thanks: 1508 in 9 Posts
This tute covers how to create shadows, highlights and seam lines with The Gimp. This is tute four in a series. Please do not attempt this tutorial until you have done tute 1 to 3 . This tutorial is an intermediate tutorial. It will not teach you things like how to open up Bodyshop, create a project or how to navigate the Gimp filing system as this information was well and truly covered in other tutes.
This tutorial is written with Gimp version 2.4.5, current as at 9th of March 2008, available for download from http://gimp-win.sourceforge.net/stable.html
Finally, this tutorial does not cover every single way of adding shadows and highlights. It just covers one nice, simple way of doing this. If you want more you need to go play and explore the limits of the tools.
1. For this tutorial we’re going to use the same lavender dress we’ve been using for Tute 2 and 3. However, before we open it, please find the original black dress with go-go boots that was the base of our original project. Create ANOTHER project from that dress. Name it anything you like, we are only going to need it very briefly.
2. Close that project and open up the Lavender dress in Bodyshop. Now open up the body~stdMatBaseTextureName file for both your new project and your Lavender dress (the texture_tute project) in The Gimp. Copy the black dress image by going to the edit menu and selecting copy.
3. Then make the Lavender dress file the active file and paste the black dress bitmap by going to the edit menu and selecting paste.
4.Open up the layers dialog box by going to the dialog menu and selecting layers. You will probably find that the black dress has been pasted as a floating layer. We need to make this a proper layer or we’re not going to be able to edit it. Right click on the floating layer and select new layer.
At this point discard and close the black dress project, we won’t need it anymore.
5. Because we’re going to make some fairly complex modifications and we may need to try our dress out in CAS and come back and make improvements, it’s a good idea to save a second copy of this file in .xcf format. The .xcf format retains the layers, which will allow you to make changes even if you’ve reimported the .bmp file through Bodyshop and it is no longer editable. Create a file somewhere on your desktop called something like “Project” and save a copy of the body~stdMatBaseTextureName file in .xcf format to that folder.
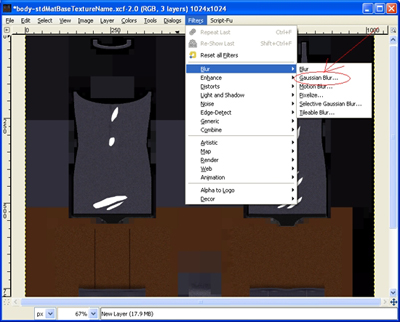
Now we’re going to start “borrowing” the highlights from the back dress layer. Add another layer onto your image by going to the layers menu and selecting new layers.
6. Selecting Areas using Paths
Paths are the most reliable method of selecting an unevenly shaped area with the Gimp. This tool selects points within an area. Once we’ve fully selected an area we can change it to a Selection that we can fill with colours or patterns.
Chose the Path tool. This tool has a graphic on it which looks something like a pen connected to anchor points (see picture)
7. Zoom in to one of the areas which has highlights. Start using the path tool to select that area by clicking on a point around the edge of the highlighted area you want to select, moving to another point and clicking. Keep going until you have points right round the highlight.
The points you’ve clicked are called Anchor points, and they’re adjustable. If you’re not happy with an anchor point left click straight on it and drag it where it needs to go.
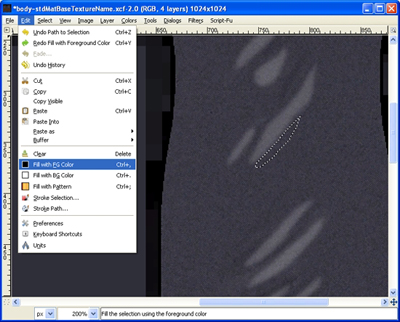
8. Once you’re happy with the area you’ve selected, press shift and the V key. This changes it to a proper selected area that you will now be able to filled with a colour or pattern. Next, press the B key. This takes away the path and only leaves the selected area.
Now fill that area in white on the new layer (the layer above your black dress layer)
Repeat this process until all the highlighted areas on the black dress are filled in white on your new layer.
Note: The key to this process is to take your time and be patient. This bit of the process takes me a good twenty minutes, and I’ve done it several times now.
My home site is http://www.sublimesims.net/
Advertisement
#2
22nd Mar 2008 at 11:06 PM
Last edited by Saraswati5 : 25th Mar 2008 at 9:06 AM.
22nd Mar 2008 at 11:06 PM
Last edited by Saraswati5 : 25th Mar 2008 at 9:06 AM.
Posts: 94
Thanks: 1508 in 9 Posts
9. Ensure you don’t have anything selected at the end (by going to the Select menu then picking None) then apply a Gaussian Blur filter to your white highlight area by going to the Filters menu then selecting Blur and finally Gaussian Blur.
The Gaussian Blur applies a nice softened edge to your white areas.
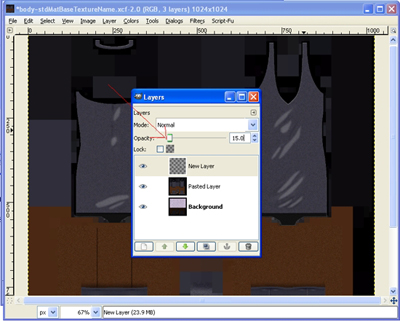
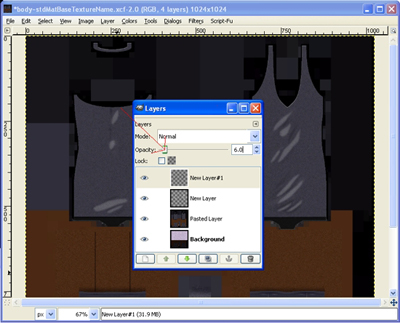
10. Your white area is still too intense though, so we’re going to drop the Opacity down on that layer by opening up the Layers Dialog box (found by going to the Dialog menu option, then Layers) and dropping the opacity down to about 15 percent.
This will still look too strong but keep in mind, these shadows are going to eventually be on a Lavender dress which can take more intense highlights.
11. Ok, now we’re going to repeat the process for shadows. First, create another new layer. Select each of the shadowed areas on the dress individually using the paths method shown above and then fill them in black.
Again, take your time.
12. Apply the Gaussian Blur filter to your shadows layer.
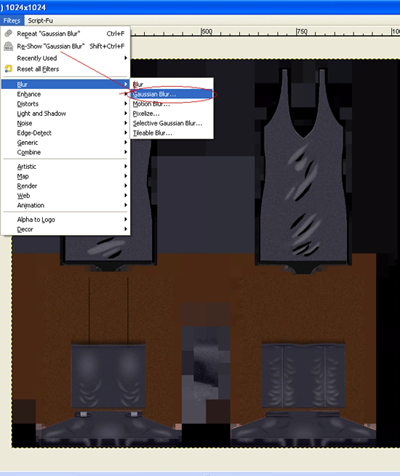
13. The reason why we put our highlights and shadows on two separate layers is that we’re going drop the opacity lower for our shadows than our highlights. The reason why we’re doing so is because if we made our shadows as intense as our highlights, they would stick out like a sore thumb on the light fabric we're using. Always use at least one layer for your shadows and another for your highlights, it gives you options later. ;-)
Drop the opacity of your shadows layer down to about six percent.
Now please delete the black dress layer from your project, you don’t need it anymore.
14. Ensure you’ve saved your changes into your body~stdMatBaseTextureName.bmp file, then refresh your project in Bodyshop. If you’re happy with what you see, import it into your game.
Note: Remember to allow for the fact that Bodyshop is darker than your game
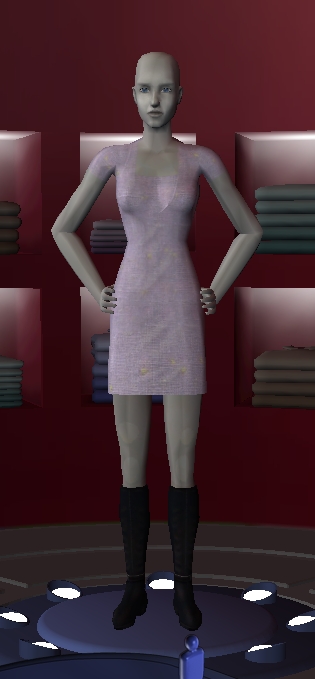
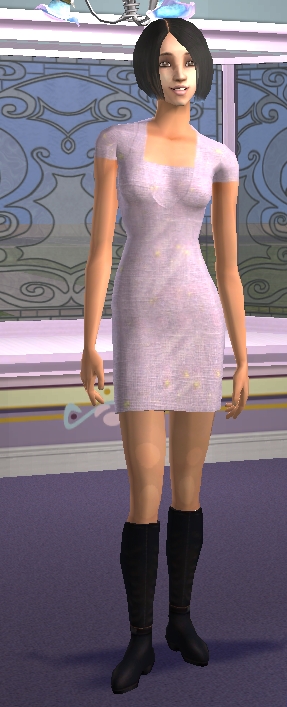
15. Finally, go take a look at your project in-game and see if you’re happy with what you’ve done.
There’s a whole heap of other things you can do with shadows and highlights, including moulding shadows around the waist and under the bust to mimic the shadowed areas in the human form. You use exactly the same principles to add those shadows and highlights as the principles we’ve explained to you today. It’s just a matter of playing with the tools til you’re happy with the result you get.
The next tute in this series Photoskinning with the Gimp is available here http://www.modthesims2.com/showthread.php?t=279087
We hope you enjoyed the tute! Saraswati and Courtney
My home site is http://www.sublimesims.net/
The Gaussian Blur applies a nice softened edge to your white areas.
10. Your white area is still too intense though, so we’re going to drop the Opacity down on that layer by opening up the Layers Dialog box (found by going to the Dialog menu option, then Layers) and dropping the opacity down to about 15 percent.
This will still look too strong but keep in mind, these shadows are going to eventually be on a Lavender dress which can take more intense highlights.
11. Ok, now we’re going to repeat the process for shadows. First, create another new layer. Select each of the shadowed areas on the dress individually using the paths method shown above and then fill them in black.
Again, take your time.
12. Apply the Gaussian Blur filter to your shadows layer.
13. The reason why we put our highlights and shadows on two separate layers is that we’re going drop the opacity lower for our shadows than our highlights. The reason why we’re doing so is because if we made our shadows as intense as our highlights, they would stick out like a sore thumb on the light fabric we're using. Always use at least one layer for your shadows and another for your highlights, it gives you options later. ;-)
Drop the opacity of your shadows layer down to about six percent.
Now please delete the black dress layer from your project, you don’t need it anymore.
14. Ensure you’ve saved your changes into your body~stdMatBaseTextureName.bmp file, then refresh your project in Bodyshop. If you’re happy with what you see, import it into your game.
Note: Remember to allow for the fact that Bodyshop is darker than your game
15. Finally, go take a look at your project in-game and see if you’re happy with what you’ve done.
There’s a whole heap of other things you can do with shadows and highlights, including moulding shadows around the waist and under the bust to mimic the shadowed areas in the human form. You use exactly the same principles to add those shadows and highlights as the principles we’ve explained to you today. It’s just a matter of playing with the tools til you’re happy with the result you get.
The next tute in this series Photoskinning with the Gimp is available here http://www.modthesims2.com/showthread.php?t=279087
We hope you enjoyed the tute! Saraswati and Courtney
My home site is http://www.sublimesims.net/
#3
29th Mar 2008 at 11:27 AM
29th Mar 2008 at 11:27 AM
Posts: 9
Omg. I Love Your Tutorials, They're Easy And Simple To Follow! I'll Be Recolouring ALOT Of Outfits Now, Thanks!
#4
2nd Apr 2008 at 8:40 AM
2nd Apr 2008 at 8:40 AM
Posts: 94
Thanks: 1508 in 9 Posts
Wakamash thank you so much hun, that makes my day :-) Courtney and I are going to have another tute for you probably in the next month where you finish off the dress..
It's really nice I got over my tute-writing burnout a little bit and I can come out and help people again :-)
My home site is http://www.sublimesims.net/
It's really nice I got over my tute-writing burnout a little bit and I can come out and help people again :-)
My home site is http://www.sublimesims.net/
Test Subject
#5
23rd May 2008 at 6:36 PM
23rd May 2008 at 6:36 PM
Posts: 4
Saraswati and Courtney thank you sooooooo much!
I have never done anything like this before! I wanted to try recolouring some athletic clothes (they are hideous) so decided to use the tutorials. After downloading GIMP and following the first three tutorials I was a bit apprehensive about doing this one as it seemed more complicated . . .
. . . but I have just made a dress thanks to your brilliant and very easy to follow tutorials! I forgot the new layer between highlighting and shadowing, but hey, I've learned it for next time!
I also have a new found appreciation for all the people who have posted their creations on the site, some may not look like much, but now I know the amount of time, effort and fiddling that goes into making something I am in awe of you all!
Definitely a lesson in more ways than one and I would recommend anyone to follow these tutorials if they can't afford the software and download GIMP for free!
Test Subject
#6
30th May 2008 at 2:27 PM
30th May 2008 at 2:27 PM
Posts: 2
#7
26th Jul 2008 at 8:03 AM
26th Jul 2008 at 8:03 AM
Posts: 94
Thanks: 1508 in 9 Posts
Hi Kiss, you need to be specific in what way you're lost.. can you explain a little more?
My home site is http://www.sublimesims.net/
My home site is http://www.sublimesims.net/
#8
31st Jul 2008 at 4:01 PM
31st Jul 2008 at 4:01 PM
Quite interesting  Have never used the Path tool, or even tried it, so thats completely new to me. Thanks!
 Have never used the Path tool, or even tried it, so thats completely new to me. Thanks!
Test Subject
#9
30th Aug 2008 at 9:23 PM
30th Aug 2008 at 9:23 PM
Posts: 1
all your tutorials are fantastic =) thanks! I did think that learning to use body shop was going to be painful, but you've made it really easy!
Test Subject
#10
23rd Sep 2008 at 1:09 AM
23rd Sep 2008 at 1:09 AM
Posts: 43
Great Tute Guys!!! Thanks a MILLION!!
#11
27th Sep 2008 at 2:45 AM
27th Sep 2008 at 2:45 AM
Thank you for this tutorial.
I do highlights and shadows just a bit differently. Instead of doing a path select, I just draw the highlight freehand. So I still get a highlight layer and shadow layer based on a Maxis texture, but they're free drawn. I do lower the opacity just like you do, but I also do a bit of blurring of the highlight and shadow layers. If the fabric is strongly patterned, I find I need higher opacity for highlights / shadows than if the fabric is solid colored.
I am glad you explained how to use the darn path tool because I couldn't for the life of me figure it out!
#12
30th Sep 2008 at 1:32 AM
30th Sep 2008 at 1:32 AM
This is an awesome tutorial! I only started using GIMP/Bodyshop yesterday, and as well as this tutorial dress I'm well on the way with another dress I designed myself. Thank you so much for all the time and effort you put into writing these! :-D
Test Subject
#13
24th Oct 2008 at 10:08 PM
24th Oct 2008 at 10:08 PM
Posts: 11
I struggled
I struggled with this one in the beginning because I kept closing the wrong folder in the beginning. Once I started over again I got it and it looks okay. Will get better over time! :lovestruc
Test Subject
#14
26th Jan 2009 at 3:41 AM
26th Jan 2009 at 3:41 AM
Posts: 3
hi,
thanks for your help with the coloring, but how do you create highlights with black clothes? i can't see anything in the gimp window except black
thanks for your help with the coloring, but how do you create highlights with black clothes? i can't see anything in the gimp window except black
#15
26th Jan 2009 at 4:09 AM
26th Jan 2009 at 4:09 AM
Black clothes should never be "pure black". Use a dark grey, not black. Shadows will be even darker grey, highlights will be lighter grey. Look at some black Maxis clothing to see an example. It's never pure black.
Test Subject
#16
26th Jan 2009 at 10:37 PM
26th Jan 2009 at 10:37 PM
Posts: 3
ok thank you ^_^
Test Subject
#17
24th Mar 2009 at 7:46 PM
24th Mar 2009 at 7:46 PM
Posts: 52
:] Thanks For The Tutorials!  They Really Help Me Out!! Ill Be Making Dresses And Everythink Now!!! :]
Ta x
Ta x
Shop Advertisement Pictures Uploaded Soon I Hope! :)
#18
4th Apr 2009 at 2:43 AM
4th Apr 2009 at 2:43 AM
In the In-game image of the dress there are weird circles on the knees that are lighter than everything else. Its weird looking 
"It's not the mesh ... It's not the texture ...It's not me ... I am pretty sure it's you."
Mez Isa Nintendork! Yayz Meez!

"It's not the mesh ... It's not the texture ...It's not me ... I am pretty sure it's you."
Mez Isa Nintendork! Yayz Meez!
Test Subject
#19
13th Apr 2009 at 2:41 PM
13th Apr 2009 at 2:41 PM
Posts: 8
Whenever I make a new selection with the pen thing it makes the other selection disappear
Test Subject
#20
13th Apr 2009 at 2:41 PM
13th Apr 2009 at 2:41 PM
Posts: 8
oops nevermind I missed a part
Who Posted
|
|